
| 일 | 월 | 화 | 수 | 목 | 금 | 토 |
|---|---|---|---|---|---|---|
| 1 | 2 | 3 | 4 | |||
| 5 | 6 | 7 | 8 | 9 | 10 | 11 |
| 12 | 13 | 14 | 15 | 16 | 17 | 18 |
| 19 | 20 | 21 | 22 | 23 | 24 | 25 |
| 26 | 27 | 28 | 29 | 30 | 31 |
- springboot
- Oracle
- jsp
- Spring Batch
- Design Patterns
- javascript
- it
- devops
- db
- laravel
- php
- tool
- 맛집
- jenkins
- IntelliJ
- linux
- Gradle
- MySQL
- redis
- 요리
- java
- AWS
- ubuntu
- Spring
- JVM
- elasticsearch
- Web Server
- Spring Boot
- Git
- ReactJS
- Today
- Total
아무거나
Mocking 라이브러리 MSW (Mock Service Worker) 를 활용하자 본문
Mocking 라이브러리 MSW (Mock Service Worker) 를 활용하자
전봉근 2022. 11. 14. 11:04Mocking 라이브러리를 활용하자
프론트엔드 개발시에 가장 이상적인 프로세스는 기획, 분석, 백엔드 개발, 프론트 개발들의 작업들이 서로 겹치지 않고 각각 진행되는 것이 좋다.
하지만 진행하는 과정에서 나오는 이슈 또는 요구사항의 변경등으로 인하여 번거롭게 작업을 진행해야되는 경우가 많다. 또한 프론트 엔드 영역과 백엔드 영역에 대한 일정이 서로 겹치게 동시 진행하는 경우도 많으므로 백엔드의 API 의 의존적이게 작업해야하는 프론트엔드의 경우는 백엔드 API 기능들이 개발서버에 배포되기 전까지 프론트엔드에서는 진행하기에 번거롭다. (물론 백엔드쪽에서 굳이 개발서버 배포를 안해도 로컬에서도 바로 확인 할 수 있는 다른 방법들이 있지만 인원이 많을 경우 변동성이 적은 개발서버 기준으로 작업하는것이 안정적이다.)
상기와 같은 이슈들이 존재하여 백엔드쪽의 API 가 개발되기전에 프론트엔드에서 먼저 개발을 할 수 있는 환경을 만들기 위해 Mocking 라이브러리를 활용하는 것이다.
Mocking 라이브러리 선택
먼저 Mocking 라이브러리는 sinon, nock, msw 등 여러가지들을 사용하고 있다고 한다.

상기 이미지의 라이브러리들을 대표적으로 사용하고 있으며 이 중 가장 러닝커브가 낮고, 디버깅에 용이하며 GraphQL 또한 적용이 가능한 MSW(=Mock Service Worker) 를 선택하게 되었다.
MSW 는 별도 환경없이 네트워크 레벨에서 요청을 가로채도록 설계되어 있어 API 에 종속성 없이 높은 수준의 작업이 가능하다. (실제 사용하는 방식처럼 테스트가 가능함)
VS Code 에 Prettier 적용.
일관적인 코드 스타일을 유지하기 위하여 Prettier 를 적용하자 (대부분 알고 있는 내용이라 간단히만 작성하였다.)
1. VS Code 에 Prettier 플러그인 설치
2. Code > Preferences > Settings > Text Editor > Default Formatter > Prettier - Code formatter 로 변경

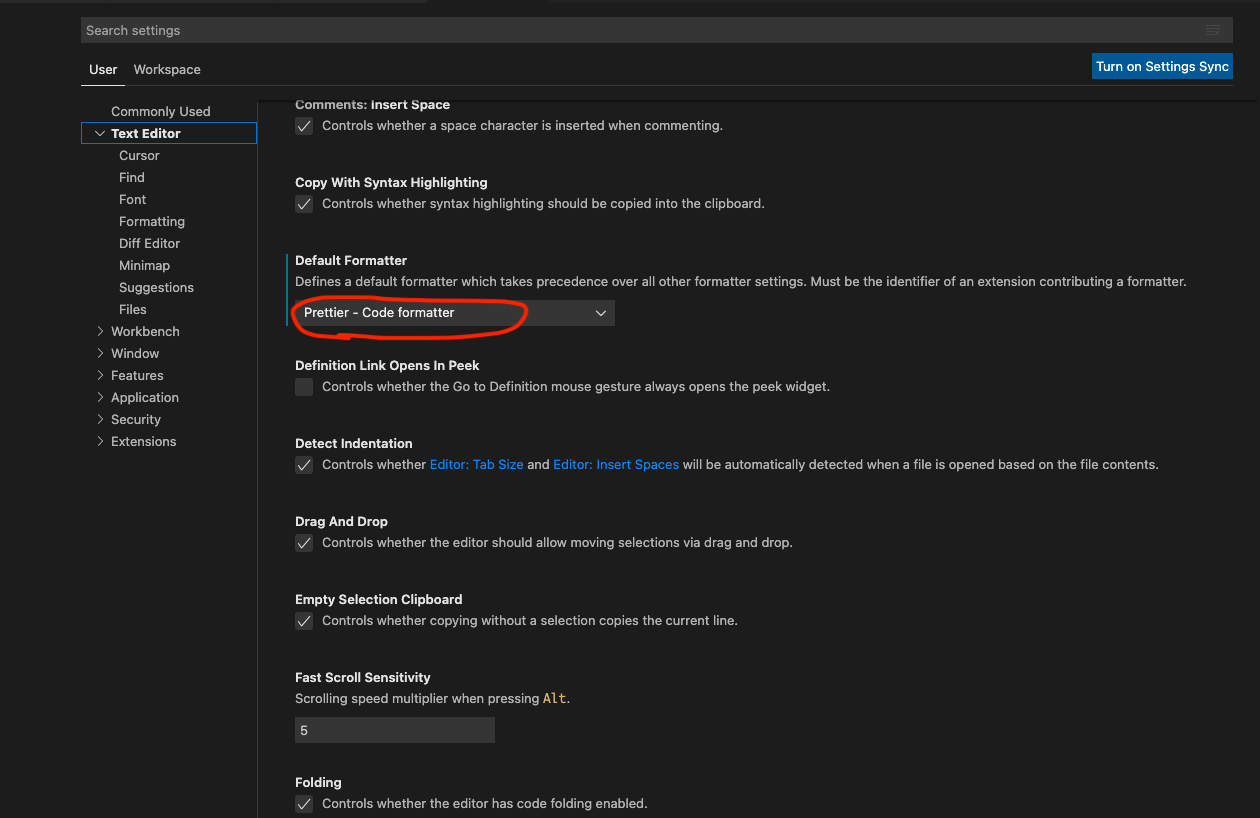
3. 검색창에 format on save 입력 후 체크

* Prettier 예외 설정 방법은 - ROOT 경로에 .prettierignore 파일 생성 (ex: 내용에 *.md 추가)
1. MSW.js 란?
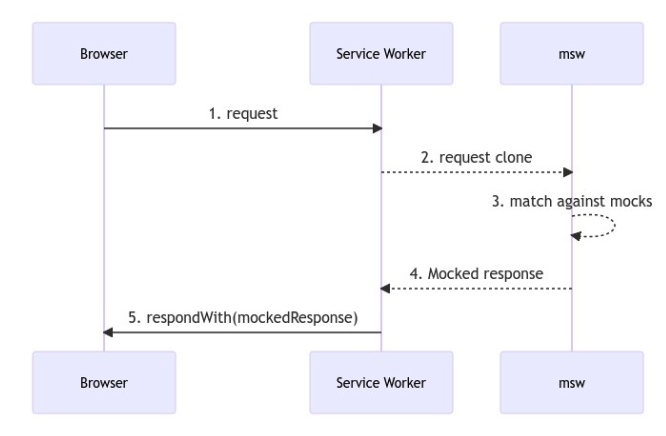
MSW (Mock Service Worker) 는 Service Worker API 를 사용하여 실제 요청을 가로채는 API Mocking 라이브러리 이다. (지원되는 API 는 REST, GraphQL 가능)
MSW 는 이벤트를 통해 애플리케이션의 나가는 요청을 수신 대기하는 서비스 워커를 등록하고 해당 요청을 클라이언트 측 라이브러리로 보내고 응답할 작업자에게 서비스 워커가 모의 응답을 전송한다.
샘플 코드는 필요한 내용에 대해서만 간단하게 작성하므로 필요한 부분이 있으면 알아서 개선시키면 된다.
2. MSW 설치
2-1. Vue Project 설치
이미 설치되어 있는 사람은 해당 내용을 건너 뛰어도 된다. 3번 부터 시작하자.
- Vue 프로젝트 설치 명령 실행
$ vue create hello-world - Please pick a preset
[ ] Default ([Vue 2] babel, eslint) [ ] Default (Vue 3 Preview) ([Vue 3] babel, eslint) [x] Manually select features - Check the features needed for your project
(*) Choose Vue version (*) Babel (*) TypeScript ( ) Progressive Web App (PWA) Support (*) Router (*) Vuex (*) CSS Pre-processors (*) Linter / Formatter ( ) Unit Testing ( ) E2E Testing - Choose a version of Vue.js that you want to start the project with
[ ] 2.x [x] 3.x (Preview) - Use class-style component syntax? (y/N)
N - Use Babel alongside TypeScript (required for modern mode, auto-detected polyfills, transpiling JSX)?
Y - Use history mode for router? (Requires proper server setup for index fallback in production)
Y - Pick a CSS pre-processor (PostCSS, Autoprefixer and CSS Modules are supported by default)
[x] Sass/SCSS (with dart-sass) [ ] Less [ ] Stylus - Pick a linter / formatter config: (Use arrow keys)
[ ] ESLint with error prevention only [ ] ESLint + Airbnb config [ ] ESLint + Standard config [*] ESLint + Prettier [ ] TSLint (deprecated) - Pick additional lint features
(*) Lint on save (*) Lint and fix on commit - Where do you prefer placing config for Babel, ESLint, etc.?
이건 각 설정파일들을 따로 관리할 수 있는[] In dedicated config files [x] In package.jsonIn dedicated config files를 보편적으로 사용하지만 개인적으로 package.json 이 좀 더 익숙하므로 선택함 - Save this as a preset for future projects? (y/N)
N
2-2. Vue Project 설치 및 실행
- NPM 설치 및 실행
$ npm install $ npm run serve - 브라우저 접속 http://localhost:8080 (하단에 표시됨)
2-3. Axios 설치
- Axios 설치
$ npm install axios
2-4. Axios 통신 샘플코드 작성 및 실행
2-4-1. 프로젝트 구조

2-4-2. 샘플코드 생성
[package.json]
...
  "eslintConfig": {
    ...
    "rules": {
      "@typescript-eslint/no-namespace": "off",
      "@typescript-eslint/no-var-requires": 0,
      "@typescript-eslint/no-explicit-any": [
        "off"
      ]
    }
  },
...
[src/api/index.ts]
import axios, {
  AxiosInstance,
  AxiosError,
  AxiosResponse,
  AxiosRequestConfig,
} from "axios";
import { ResultEnum } from "@/enums/httpEnum";
import { checkStatus } from "./helper/checkStatus";

const axiosConfig = {
  timeout: 10000,
};

class RequestHttp {
  service: AxiosInstance;
  public constructor(axiosConfig: AxiosRequestConfig) {
    this.service = axios.create(axiosConfig);

    this.service.interceptors.request.use(
      (axiosConfig: AxiosRequestConfig) => {
        return {
          ...axiosConfig,
          headers: { ...axiosConfig.headers, "x-access-token": "bkjeon" },
        };
      },
      (error: AxiosError) => {
        return Promise.reject(error);
      }
    );
    this.service.interceptors.response.use(
      (response: AxiosResponse) => {
        const { data } = response;

        if (data.code && data.code !== ResultEnum.SUCCESS) {
          console.log("Application Error !!: " + data.msg);
          return Promise.reject(data);
        }

        return data;
      },
      async (error: AxiosError) => {
        const { response } = error;
        if (error.message.indexOf("timeout") !== -1) {
          console.log("Request timed out! Please try again later");
        }

        if (response) checkStatus(response.status);
        return Promise.reject(error);
      }
    );
  }
  get<T>(url: string, params?: object, _object = {}): Promise<T> {
    return this.service.get(url, { params, ..._object });
  }
  post<T>(url: string, params?: object, _object = {}): Promise<T> {
    return this.service.post(url, params, _object);
  }
  put<T>(url: string, params?: object, _object = {}): Promise<T> {
    return this.service.put(url, params, _object);
  }
  delete<T>(url: string, params?: any, _object = {}): Promise<T> {
    return this.service.delete(url, { params, ..._object });
  }
}

export default new RequestHttp(axiosConfig);
[src/api/helper/checkStatus.ts]
export const checkStatus = (status: number): void => {
  switch (status) {
    case 400:
      console.log("Request failed! Please try again later");
      break;
    case 500:
      console.log("Service exception!");
      break;
    default:
      console.log("Request failed!");
  }
};
[src/api/interface/index.ts]
export interface Result {
  code: string;
  msg: string;
}

export interface ResultData<T = any> extends Result {
  data: T;
}

export interface ResPage<T = any> extends Result {
  pageNum: number;
  pageSize: number;
  totalCnt: number;
  data: T[];
}

export interface ReqPage {
  pageNum?: number;
  pageSize?: number;
}

export namespace Sample {
  export interface ReqGetSampleParams extends ReqPage {
    title?: string;
    description?: string;
  }
  export interface ResSampleList {
    title: string;
    description: string;
    ingredients: string[];
    image: string;
    id: number;
  }
}
[src/api/modules/samples.ts]
import { Sample } from "@/api/interface/index";

import http from "@/api";

export const getSampleList = (params: Sample.ReqGetSampleParams) => {
  return http.get<Sample.ResSampleList[]>(
    `https://api.sampleapis.com/coffee/hot`,
    params
  );
};
[src/enums/httpEnums.ts]
export enum ResultEnum {
  SUCCESS = 200,
  ERROR = 500,
  TIMEOUT = 10000,
  TYPE = "SUCCESS",
}

export enum RequestEnum {
  GET = "GET",
  POST = "POST",
  PATCH = "PATCH",
  PUT = "PUT",
  DELETE = "DELETE",
}

export enum ContentTypeEnum {
  JSON = "application/json;charset=UTF-8",
  TEXT = "text/plain;charset=UTF-8",
  FORM_URLENCODED = "application/x-www-form-urlencoded;charset=UTF-8",
  FORM_DATA = "multipart/form-data;charset=UTF-8",
}
[src/views/SampleView.vue]
<template>
  <div v-if="sampleList">
    <ul v-for="(item, index) in sampleList" :key="index">
      <li>{{ item.id }}</li>
      <li>{{ item.title }}</li>
      <li>{{ item.description }}</li>
      <li>{{ item.image }}</li>
      <li>{{ item.ingredients }}</li>
    </ul>
  </div>
</template>

<script lang="ts">
import { onBeforeMount, reactive, ref } from "vue";
import { Sample } from "@/api/interface";
import { getSampleList } from "@/api/modules/sample";

export default {
  setup() {
    const sampleList = ref<Sample.ResSampleList[]>([]);
    const requestSampleParam = reactive<Sample.ReqGetSampleParams>({});

    onBeforeMount(() => {
      getSamples();
    });

    const getSamples = async () => {
      await getSampleList(requestSampleParam).then((response) => {
        sampleList.value = response;
      });
    };

    return {
      sampleList,
    };
  },
};
</script>

<style></style>
[src/router/index.ts]
import { createRouter, createWebHistory, RouteRecordRaw } from "vue-router";
import HomeView from "../views/HomeView.vue";

const routes: Array<RouteRecordRaw> = [
  ...
  {
    path: "/sample",
    name: "sample",
    component: () => import("../views/sample/SampleView.vue"),
  },
];

...
2-4-3. 샘플코드 실행
npm run serve 실행하면 하기 이미지와 같이 데이터를 출력하는 것을 볼 수 있다.

2-4-4. MSW 적용을 위한 샘플코드 작성
[src/router/index.ts]
import { createRouter, createWebHistory, RouteRecordRaw } from "vue-router";
import HomeView from "../views/HomeView.vue";

const routes: Array<RouteRecordRaw> = [
  ...
  {
    path: "/user",
    name: "user",
    component: () => import("../views/user/UserView.vue"),
  },
];

...
[src/api/modules/user.ts]
import { ResPage, ResultData, User } from "@/api/interface/index";

import http from "@/api";

export const getUserList = (params: User.ReqGetUserParams) => {
  return http.get<ResPage<User.ResUser>>(`/api/users`, params);
};

export const getUserData = (params: { id: string }) => {
  return http.get<ResultData<User.ResUser>>(`/api/users/` + params.id);
};
[src/views/user/UserView.scss]
/* 필요시 작성 */
[src/views/user/UserView.vue]
<template>
  <div v-if="userData">
    <ul>
      <li>{{ userData.id }}</li>
      <li>{{ userData.username }}</li>
      <li>{{ userData.age }}</li>
      <li>{{ userData.email }}</li>
    </ul>
  </div>
  <br /><br /><br /><br />
  <div v-if="userList">
    <div>{{ userListCnt }}</div>
    <ul v-for="(item, index) in userList" :key="index">
      <li>{{ item.id }}</li>
      <li>{{ item.username }}</li>
      <li>{{ item.age }}</li>
      <li>{{ item.email }}</li>
    </ul>
  </div>
</template>

<script lang="ts">
import { onBeforeMount, reactive, ref } from "vue";
import { User } from "@/api/interface";
import { getUserList, getUserData } from "@/api/modules/user";

export default {
  setup() {
    const userListCnt = ref<number>(0);
    const userList = ref<User.ResUser[]>([]);
    const userData = ref<User.ResUser>();
    const requestUserParam = reactive<User.ReqGetUserParams>({
      pageNum: 1,
      pageSize: 10,
      username: "bkjeon",
      email: "bkjeon@gmail.com",
    });
    const requestUserId = "M221114EEE";

    onBeforeMount(() => {
      getUsers();
      getUser();
    });

    const getUsers = async () => {
      await getUserList(requestUserParam).then((response) => {
        userListCnt.value = response.totalCnt;
        userList.value = response.data;
      });
    };

    const getUser = async () => {
      await getUserData({ id: requestUserId }).then((response) => {
        userData.value = response.data;
      });
    };

    return {
      userListCnt,
      userList,
      userData,
    };
  },
};
</script>

<style scoped lang="scss">
@import "./UserView.scss";
</style>
2-5. MSW 적용
2-5-1. MSW 패키지 설치
$ npm install msw --save-dev // or yarn add msw --dev
2-5-2. Service Worker 를 위한 JS 생성
$ npx msw init public --save // 경로는 public 폴더 안으로 지정
MSW CLI 를 통하여 init 명령어와 함께 사용하고자 하는 프로젝트의 public directory 를 지정해서 실행하면 mockServiceWorker.js 가 생성된다.
2-5-3. Mocking 할 API handler / mock data 생성
[src/mock/modules/user_handler.ts]
import { rest } from "msw";
import { users, user } from "@/mock/modules/data/users";

const handlers = [
  rest.get("/api/users", (req, res, ctx) => {
    return res(ctx.status(200), ctx.delay(1000), ctx.json(users));
  }),
  rest.get("/api/users/M221114EEE", (req, res, ctx) => {
    return res(ctx.status(200), ctx.delay(1000), ctx.json(user));
  }),
];

export default handlers;
[src/mock/data/users.ts]
export const user = {
  data: {
    id: "M221114EEE",
    username: "bkjeon",
    age: 33,
    email: "gcijdfdo@gmail.com",
  },
};

export const users = {
  pageNum: 1,
  pageSize: 10,
  totalCnt: 3,
  data: [
    {
      id: "M221114EEE",
      username: "bkjeon",
      age: 33,
      email: "gcijdfdo@gmail.com",
    },
    {
      id: "M220014EEE",
      username: "bkjeon2",
      age: 31,
      email: "gcijdfdo2@gmail.com",
    },
    {
      id: "M221114EAA",
      username: "bkjeon3",
      age: 23,
      email: "gcijdfdo3@gmail.com",
    },
  ],
};
2-5-4. 핸들러를 MSW 에서 사용할 수 있도록 import
[src/mock/browser.ts]
import { setupWorker } from "msw";
import user_handler from "@/mock/modules/user_handler";

export const worker = setupWorker(...user_handler);
2-5-5. MSW 실행을 위한 코드 추가
[src/main.ts]
...

// MSW
if (process.env.NODE_ENV === "development") {
  const { worker } = require("@/mock/browser");
  worker.start();
}

...
3. 실행결과 확인

상기 이미지와 같이
[MSW] Mocking enabled.메세지를 확인할 수 있다. (중지는 src/main.ts 의 worker.stop() 으로 하면 된다.)
참고
- https://mswjs.io/
- https://tech.kakao.com/2021/09/29/mocking-fe/
'Javascript & HTML & CSS > vuejs' 카테고리의 다른 글
| computed vs watch (0) | 2022.08.03 |
|---|---|
| [vuejs] Vuex VS Eventbus (0) | 2022.08.02 |
| vuejs # 기호 url path에서 제거하기 (0) | 2019.10.08 |
| vuejs를 선택한 이유 (0) | 2019.10.08 |
